Product Introduction
The tissue homogenizer utilizes a vertical shock system with high-speed reciprocating motion to make the frozen
samples in the grinding tube collide with the grinding beads, The resulting grinding shear force and impact force
completely crush the tissues, making it a specialized device for rapid one-time processing of multiple samples in
research institutions,universities, agricultural colleges, biomedical and food testing fields.
Product Features:
1.Linear guide rail, stable and durable, capable of continuous grinding for 24 hours
2.Capable of processing up to 96 samples simultaneously (standard configuration of 24 samples)
3.Adapter module can be pre-cooled at low temperature to reduce sample degradation
4.Multiple adapters are optional
5.Compact and sleek appearance
Products Parameters
Working Environment
| Power Parameters |
200-240VAC(110Vavailable),50-60Hz.240W: power voltage fluctuation does not exceed 10% ofthe rated powervoltage. |
| Room Temperature | 5℃-40℃ |
| Relative Humidity | Max.80% |
| OperatingLocation | Indoor |
Technical Parameters
| Cat.NO. | SWE-C6 |
| Dimensions | 296×452×376mm |
| Weight | 26.2kg |
| Screen size | 5 inches |
| Operating Time | Operatingtime:0-9999s,Pause time:0-999s,Operating cycles: 1-99 times |
Unpacking and Installation
01.Remove the instrument from the packaging box, place it in an appropriate location, and confirm that all parts are present and accounted for.
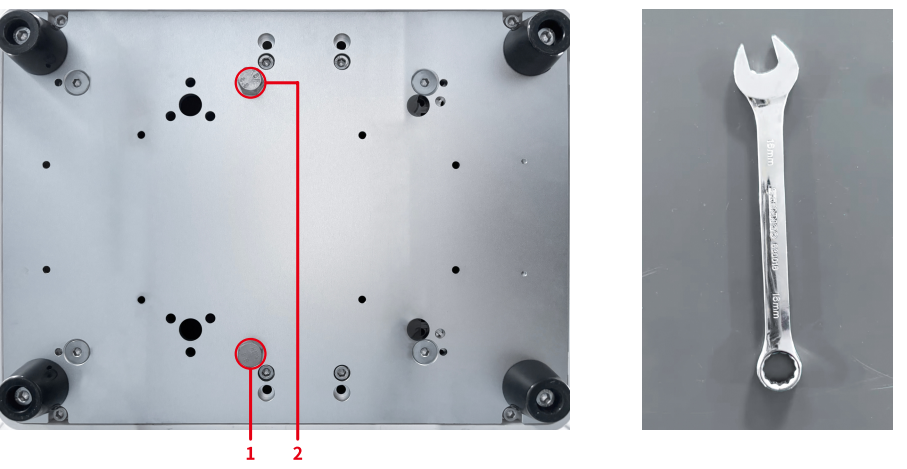
02.Use the wrench provided in the accessories to remove the two fastening screws at the bottom of the instrument (before grinding for the first time, please ensure that the fastening screws have been removed).

03. Place the instrument on a horizontal and flat laboratory bench to prevent vibration during operation.
04.Connect the power supply that matches the name plate, and turn on the power switch on the back of the instrument.
05.Install the adapter and screws correctly, and then cover the top lid to start the instrument.
Sample Preparation

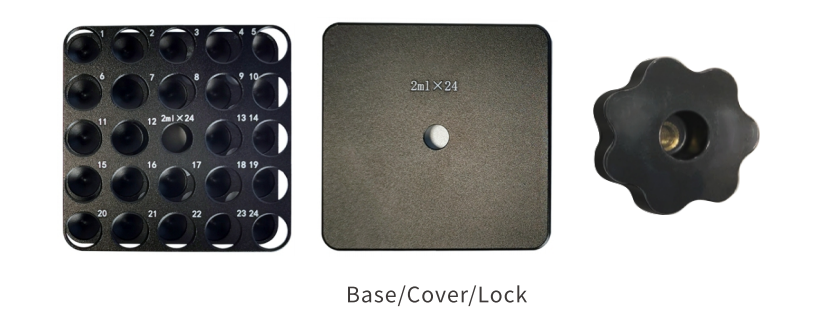
The adapter can grind 24 samples at the same time with standard 2 ml centrifuge tubes. The adapter includes a base that can hold 24 centrifuge tubes, a top cover, and a screw lock.
Take the sample to be grinded and put it into the grinding tube. It is recommended that the amount of sample is not more than 100mg. Add the corresponding extraction solution, and keep the total volume of the sample and the extraction solution within 1/2 of the tube. Then add several grinding beads of appropriate size. To ensure the grinding efficiency and quality, for larger samples, it is recommended to cut them into small pieces with scissors first.
Unscrew the screw lock, remove the cover, place the grinding tube into the adapter, put on the cover and screw lock, and tighten the screw lock clockwise (the placement of the test tubes needs to follow the principles of symmetry and balance).
Operation Instructions
Operation Steps

01.Insert the power cord of the instrument into a grounded power socket that matches the name plate, and turn on the power switch on the side of the instrument;
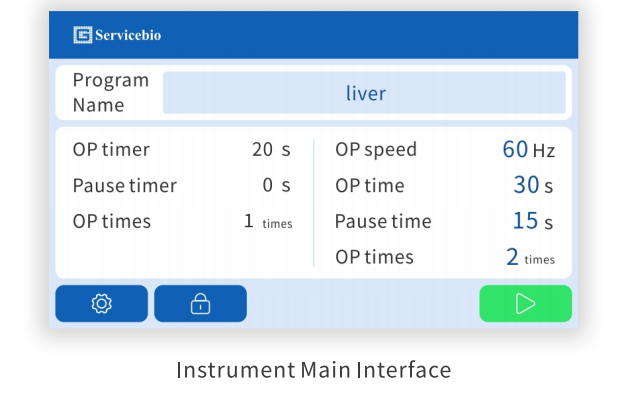
02.After the startup interface appears,wait for approximately 5 seconds to enter the main operating interface;
03.Place the adapter with the grinding tubes inside, cover the adapter with its cover,tighten the black screw.
04.Set the operating frequency, time, and number of cycles;
05.Click![]() to start the grinding process. The instrument will automatically stop after the running timer resets to zero.
to start the grinding process. The instrument will automatically stop after the running timer resets to zero.
Parameter Settings

The instrument is preset with 1 set of "Program 1" parameters and 10 sets of common tissue grinding parameters, totaling 24 sets of parameters, each of which is editable. The "Program 1" parameters can be edited on the main interface and saved to the background program.
For example, click on "Liver and Spleen" to enter the parameter setting interface, select the sample name, running time, pause time,number of runs, and operating frequency. After making the modifications,click![]() to save the corresponding parameters.Click
to save the corresponding parameters.Click![]() ,to start the grinding process with one click. For samples that require long grinding time, the number of cycles and pause time can be set:
,to start the grinding process with one click. For samples that require long grinding time, the number of cycles and pause time can be set:
The logic of a single cycle is: grinding time + pause time (the pause time is not triggered when the number of cycles is set to 1)
The total grinding time is: (single grinding time + pause time) * number of cycles
Click the![]() button to start the device. The touchscreen will display a countdown according to the set time. and the grinding ends when the countdown is complete, and the instrument automatically stops operating. Wait for the instrument to completely stop running, then open the top cover of the instrument, unscrew the fixing screw, and take out the adapter. If the grinding is not thorough, repeat the above operation until the grinding requirements are met.
button to start the device. The touchscreen will display a countdown according to the set time. and the grinding ends when the countdown is complete, and the instrument automatically stops operating. Wait for the instrument to completely stop running, then open the top cover of the instrument, unscrew the fixing screw, and take out the adapter. If the grinding is not thorough, repeat the above operation until the grinding requirements are met.
Password Setting

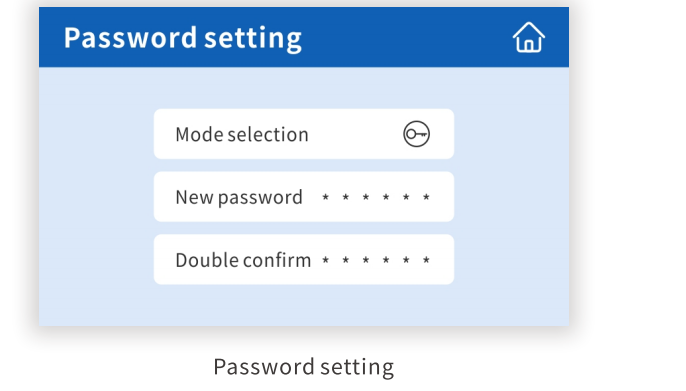
The instrument can be set with a startup password.
When the password mode is![]() ,a correct 6-digit password (the initial password is 123456, which can be modified by the user) needs to be entered after powering on to proceed to the next operation.
,a correct 6-digit password (the initial password is 123456, which can be modified by the user) needs to be entered after powering on to proceed to the next operation.
Maintenance
Perform the following routine maintenance daily after use to ensure reliable operation of the instrument:
1、If solvent, saltwater, acidic or alkaline solution is spilled on the instrument, to avoid damage to the instrument, it should be immediately wiped clean with a damp cloth.
2、Ensure that the power is turned off and the power cord is unplugged before cleaning.
3、Do not perform high-pressure sterilization on any part of the instrument, including the adapter.
4、The components of the adapter should be cleaned after use. Use appropriate cleaning agents, rinse with distilled water, and then dry with paper towels.
5、After using appropriate cleaning agents, use a soft cloth to wipe the instrument clean.
6、The following disinfectants and cleaning agents are recommended for cleaning the instrument and adapter:
Ordinary cleaning agent
Neutral detergent
Alcohol solution(70%)
Parameter settingsand reference for grinding beads
|
|
Grinding Beads |
Grinding Time |
Pause Time |
Cycle Number |
Frequency |
|
Liver and Spleen |
4mm*1 3mm*1 |
30s |
15s |
2 |
60Hz |
|
Muscle |
4mm*2 3mm*2 |
45s |
15s |
2 |
60Hz |
|
Skin |
4mm*2 3mm*3 |
60s |
20s |
4 |
70Hz |
|
Blood Vessel |
4mm*2 3mm*2 |
60s |
15s |
3 |
70Hz |
|
Aorta |
4mm*2 3mm*3 |
60s |
15s |
4 |
70Hz |
|
Soft Bone |
4mm*2 3mm*3 |
60s |
20s |
5 |
70Hz |
|
Plant Leaf |
4mm*1 3mm*2 |
45s |
15s |
3 |
60Hz |
|
Plant Stem |
4mm*1 3mm*2 |
60s |
15s |
3 |
60Hz |
|
Hair |
4mm*2 3mm*3 |
90s |
20s |
4 |
70Hz |
|
Hard Bone |
4mm*2 3mm*4 |
90s |
30s |
5 |
70Hz |
Note: It is recommended to use steel grinding beads for protein extraction and zirconia grinding beads for RNA extraction. (These conditions are for reference only, and can be adjusted at any time during the experiment based on the grinding effect.)
For RNA extraction, the grinding time should be appropriately extended compared to protein extraction. Add RNA extraction buffer during grinding. The specific grinding time depends on the amount and type of tissue being ground. Samples that are difficult to grind can be repeatedly ground 2-3 times, and the specific situation can be adjusted appropriately based on the experiment.
Grinding of strong and tough tissues
For difficult-to-grind samples (such as soft bone, hair, etc.), a 2mL grinding tube can be used. Cut the sample into small pieces of about 1-2mm, then add 3 pieces of 4mm grinding beads. Close the grinding tube tightly and place it in liquid nitrogen for 2-3 minutes to freeze, without adding extraction buffer. Grind dry at 70Hz for 60 seconds, then add extraction buffer to the grinding tube and repeat the grinding process once. If the grinding effect is not satisfactory, it can be frozen again and the experimental steps repeated.。
Grinding of bone tissue
For bone tissue, use a dedicated steel grinding jar and adapter. Add bone tissue and steel beads to the grinding jar, tighten the lid, and immerse the entire jar in liquid nitrogen for 15 minutes. Remove it and grind at 70Hz for 18 seconds (set for cyclic grinding). After grinding, take out the powdered tissue and add extraction buffer to a portion of it. Mix thoroughly by shaking and proceed with subsequent experimental operations.
Notes
01. When using 4mm grinding beads or large grinding beads, it is necessary to use a 2mL U-bottom tube. 1.5mL conical tube may cause obstruction, affecting the grinding effect (it is recommended to use our company's EP-200-Y centrifuge tube, which has thicker walls and higher material strength, suitable for grinding).
02. The tissue size is preferably below 1-3mm, and the weight should be within 100mg.
03. If you want to reuse the grinding beads, it is recommended to soak them in absolute ethanol for 15 minutes before use, then filter out the grinding beads and dry them for future use.
04. To prevent sample degradation while ensuring the grinding effect, the following principles should be followed:
Minimize the number of grinding beads used
Minimize the grinding time
05. When using the instrument, ensure that the load on both sides of the adapter is balanced, and do not use it unilaterally.
06. To protect the internal circuitry and mechanics of the instrument, do not rinse it with running water. Use a damp cloth to clean it.
07. If any abnormality occurs during use, immediately disconnect the power and contact a professional for handling.
08. The instrument must be placed on a horizontal and flat laboratory bench to prevent vibration during operation.
09. After ensuring that the adapter and fastening screws are correctly installed, close the top cover and start the instrument.
|
Cat.No.
|
Product Name
|
Spec.
|
Operation
|
|---|
|
KZ-5F-3D
|
3D Tissue Homogenizer (-40℃)
|
(-40℃)
|
|
|
KZ-III
|
Tissue Homogenizer (Room Temperature)
|
Room Temperature
|
|
|
KZ-III-96
|
Tissue Homogenizer Room Temperature (96-well Plate)
|
Tissue Homogenizer Room Temperature (96-well Plate)
|
|
|
KZ-III-F
|
Tissue Homogenizer Low-temperature (-10℃)
|
(-10℃)
|
|
|
KZ-III-FP
|
Tissue Homogenizer Low-temperature (-40℃)
|
(-40℃)
|
|
|
KZ-III-YLS
|
Water-quality Chlorophyll Homogenizer
|
Room Temperature
|
|
|
SWE-C6
|
Tissue Homogenizer (Vertical)
|
set
|
|
|
SWE-FP
|
Tissue Homogenizer Low Temperature (-50℃, Freezing Table)
|
(-50℃, Freezing Table)
|
You may also like
-
SERVICEBIO Tissue Homogenizer (Room Temperature)
![]()
- Regular price
- €4.149,95 EUR
- Sale price
- €4.149,95 EUR
- Regular price
-
- Unit price
- per
Sold out -
SERVICEBIO Tissue Homogenizer Low Temperature
![]()
- Regular price
- €9.073,95 EUR
- Sale price
- €9.073,95 EUR
- Regular price
-
- Unit price
- per
Sold out -
SERVICEBIO Vertical Tube Rotator/Mixer
![]()
- Regular price
- €562,95 EUR
- Sale price
- €562,95 EUR
- Regular price
-
- Unit price
- per
Sold out -
SERVICEBIO Rotary Tube Mixer
![]()
- Regular price
- €632,95 EUR
- Sale price
- €632,95 EUR
- Regular price
-
- Unit price
- per
Sold out


